I’ve installed enough driveway entrance shutters to know that most people mess up the basics.
You’re here because you want shutters that look good and stay put. Not ones that sag after three months or leave your entrance looking worse than before.
Here’s the thing: installation mistakes are what separate a professional look from a DIY disaster. And most of those mistakes happen in the first ten minutes.
I’m going to walk you through the entire process. From picking the right shutters to making sure they’re mounted so securely that they’ll outlast your driveway.
We use proven home improvement methods that actually work. Not shortcuts that fall apart when the weather changes.
You’ll learn exactly how should exterior shutters fit drhextreriorly, how to measure correctly, and how to avoid the surface damage that comes from drilling in the wrong spots.
This isn’t about making your entrance look fancy. It’s about doing the job right the first time so you don’t have to redo it next year.
Choosing the Right Shutters for Your Driveway Entrance
Let me be honest with you.
Most people overthink this decision. They get paralyzed choosing between materials and end up buying whatever’s cheapest at the hardware store.
I’ve done it both ways. And I have opinions.
Material Matters More Than You Think
Wood looks beautiful. I won’t argue with that. There’s something about real wood shutters on brick or stone pillars that just works.
But here’s my take. Wood on a driveway entrance is asking for trouble. You’re dealing with car exhaust, road salt in winter, and constant sun exposure. That classic look comes with a price tag of regular maintenance and eventual replacement.
Vinyl is the opposite problem. Sure, it’s cheap and weather-resistant. But it looks cheap too (and you can usually tell from the street).
Composite is where I land every time. It gives you the wood look without the constant upkeep. For a high-traffic area like your driveway, that matters. I’d rather spend money once on quality composite than repaint wood shutters every two years.
Decorative vs Functional
You don’t need operable shutters on masonry pillars. I know some designers will disagree with me on this. They’ll say functional shutters are more authentic.
But think about it. You’re not opening and closing shutters on a driveway pillar. Decorative shutters are simpler to install and they give you exactly what you want, which is visual interest.
Save the functional hardware for your actual house windows.
Getting the Measurements Right
This is where most DIY projects go sideways.
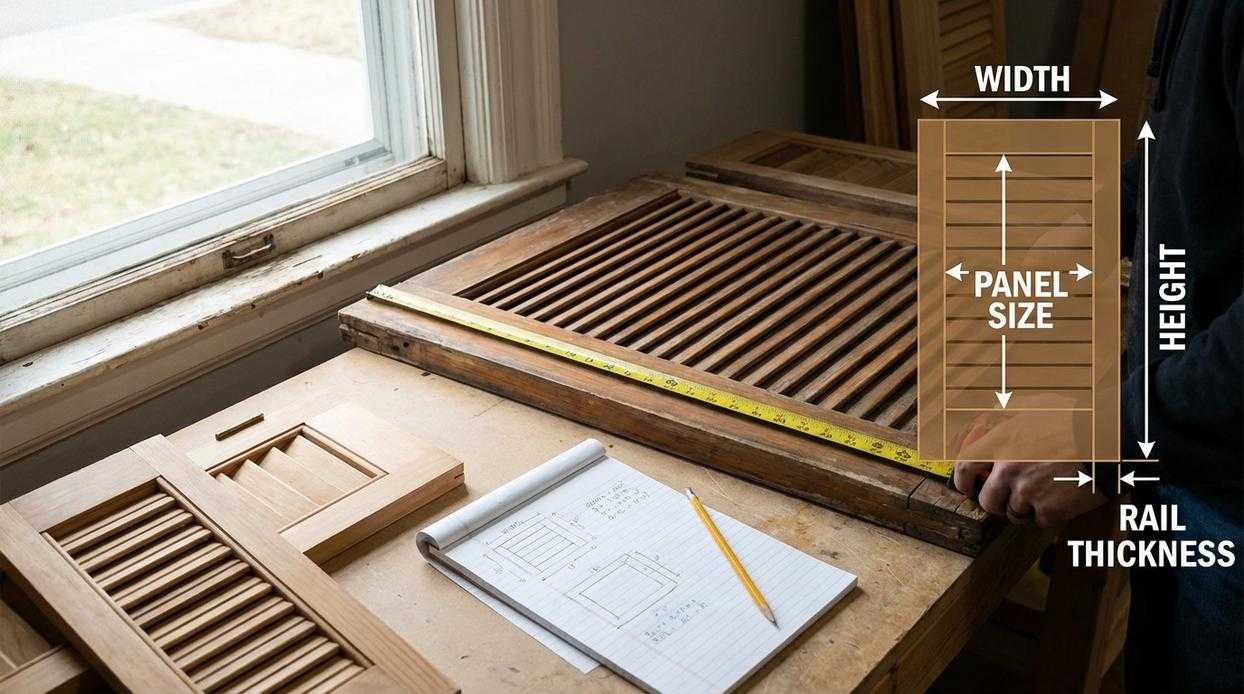
Measure the space on your pillar where the shutter will sit. Write it down. Measure again (because you probably will second-guess yourself).
Here’s the rule I follow. Each shutter should be about one-third to one-half the width of whatever it’s framing. Even if there’s no actual window there.
Too small and they look like an afterthought. Too big and they overwhelm the entrance.
When you’re figuring out how should exterior shutters fit Drhextreriorly, remember that proportion matters more than exact measurements. Your eye knows when something looks off, even if you can’t explain why.
Get samples if you can. Hold them up to the pillar before you buy. It’s worth the extra trip to drhextreriorly or the store.
Essential Tools and Materials Checklist
You don’t want to be halfway up a ladder when you realize you’re missing the right drill bit.
Trust me on this one.
Getting your tools together first saves you time and a lot of frustration. I’ve watched too many people start this project only to make three trips to the hardware store. By organizing your tools and materials beforehand, you’ll not only streamline your workflow but also avoid the kind of time-wasting chaos that often leaves players feeling Drhextreriorly drained before they’ve even begun their gaming projects.
Here’s what you actually need.
Tools You’ll Use
Tape measure, power drill, masonry drill bits if you’re working with brick or stone, standard drill bits for the shutters themselves, a level, pencil or chalk line, caulk gun, and a screwdriver or impact driver.
That’s it. Nothing fancy.
Materials to Have Ready
Your exterior shutters (obviously), shutter fasteners or screws rated for outdoor use, wall anchors if you’re mounting to masonry, and exterior-grade silicone caulk.
Make sure those fasteners match your mounting surface. Wood siding needs different hardware than brick.
Safety Gear
Safety glasses keep debris out of your eyes. Work gloves protect your hands. Simple but necessary.
Now here’s what most guides won’t tell you.
Before you even touch that drill, you need to figure out how should exterior shutters fit drhextreriorly on your specific windows. Because if your measurements are off, all these tools won’t help you.
You’ll also want to think about what happens after installation. Will you need touch-up paint? What about maintenance supplies for next year? I keep a small container of matching caulk and extra screws in my garage just in case.
Step-by-Step Installation Guide for Driveway Shutters
I’m going to walk you through this installation one step at a time.
You don’t need to be a contractor to do this right. You just need to work carefully and not rush through the measurements.
Step 1: Prepare the Mounting Surface
Start by cleaning your brick, stone, or stucco pillar. Get rid of dust, dirt, and any loose debris. Which Exterior Doors Are Best Drhextreriorly is where I take this idea even further.
Hold a shutter in place where you want it. Use your level to make sure it’s perfectly vertical (this matters more than you think). Lightly mark the corners with a pencil.
Take a step back and look at it. Does the position feel right? This is your last chance to adjust before you start drilling.
Step 2: Mark Your Drill Holes
Lay the shutter on a flat surface where you won’t damage it.
Measure and mark where your mounting screws will go. I typically place marks two inches from the top, two from the bottom, and one in the center. This gives you solid support without overdoing it.
Step 3: Pre-Drill the Shutters
Grab a drill bit that’s slightly smaller than your screw diameter.
Carefully drill through each mark on the shutter. This step prevents the material from splitting when you drive the screws in later (trust me on this one). When embarking on your House Building Drhextreriorly journey, remember that carefully drilling through each mark on the shutter is crucial to prevent the material from splitting later when you drive in the screws.
Step 4: Drill Pilot Holes into the Masonry
Hold your pre-drilled shutter up to those guide marks on the pillar.
Use the holes in the shutter as a template. Mark the exact spots on the masonry through each hole. Remove the shutter and switch to your masonry bit.
Drill pilot holes for your fasteners or anchors. Make sure the depth matches the hardware you’re using. Too shallow and your screws won’t hold. Too deep and you’ve wasted effort.
Step 5: Secure the Shutter
Line up the shutter with the pilot holes in the pillar.
Drive your exterior-grade screws through the shutter and into the wall. Here’s what most people get wrong: they overtighten immediately. Don’t do that.
Get all screws started first. Then tighten them one by one until the shutter sits snug against the surface.
Before you finish, check how should exterior shutters fit Drhextreriorly to make sure your spacing and alignment match professional standards.
Step 6: Waterproof the Installation
This is the step people skip. Don’t skip it.
Apply a small bead of exterior silicone caulk over each screw head. Keep it neat. This prevents water from getting into the screw holes and damaging your masonry over time.
Let the caulk cure according to the manufacturer’s instructions before you consider the job done.
Pro tip: Take photos of your shutter placement before you start drilling. If you’re installing multiple shutters, you can reference these to keep everything consistent.
Finishing Touches and Long-Term Maintenance
Step back about 10 feet.
Does everything look level? Do the shutters match on both sides of the window?
I always tell people, “If it looks off from the street, it is off.” Your eye catches misalignment faster than you think.
For wood shutters, here’s what matters. Paint or seal every side. Yes, even the back. Moisture doesn’t care which side faces your house.
A contractor once told me, “The shutters that fail are the ones people forgot to seal on the backside.” He was right. I’ve seen it happen.
Now for the maintenance part.
Check your shutters once a year. Tighten any loose screws. Look at the caulk lines. If you see gaps, fill them.
Clean with mild soap and water. That’s it. Nothing fancy.
Some people ask me how how should exterior shutters fit drhextreriorly affects long-term care. Simple answer: properly fitted shutters need less maintenance because they’re not fighting wind or pulling away from the wall.
(Badly fitted shutters work themselves loose every season.)
Keep dirt and grime off the surface. It’s not just about looks. Buildup traps moisture against the material. To effectively maintain your gaming setup’s longevity, consider how your Exterior Plans Drhextreriorly can help keep dirt and grime at bay, preventing moisture buildup that could compromise the materials over time.
Your shutters should last years with basic care. Just don’t skip the annual checkup.
A Lasting Upgrade to Your Home’s Entrance
You now have a complete roadmap for installing exterior shutters at your driveway entrance.
Your home’s curb appeal just got a serious boost.
I walked you through the measurement process, helped you pick the right materials, and showed you how to fasten everything properly. These details matter because they’re what separate shutters that look great from shutters that fall apart in two years.
You’ve sidestepped the common problems. No misaligned panels or water damage creeping in behind your new installation.
This isn’t just about making things look nice (though that’s a big part of it). You’ve added real value to your property with work that’ll hold up for years.
Here’s what to do next: Step back and check your alignment one more time. Make sure you’ve sealed all the edges properly. Then grab your phone and take some before and after shots.
You wanted to know how should exterior shutters fit drhextreriorly and now you have your answer. The shutters are up, they’re secure, and they’re going to last.
This is the kind of project you can point to with pride. Professional quality work that you did yourself. Exterior Plans Drhextreriorly.
 Tylisia Rothwyn writes the kind of interior renovation ideas content that people actually send to each other. Not because it's flashy or controversial, but because it's the sort of thing where you read it and immediately think of three people who need to see it. Tylisia has a talent for identifying the questions that a lot of people have but haven't quite figured out how to articulate yet — and then answering them properly.
They covers a lot of ground: Interior Renovation Ideas, Home Design Inspirations, Gardening and Landscaping Tips, and plenty of adjacent territory that doesn't always get treated with the same seriousness. The consistency across all of it is a certain kind of respect for the reader. Tylisia doesn't assume people are stupid, and they doesn't assume they know everything either. They writes for someone who is genuinely trying to figure something out — because that's usually who's actually reading. That assumption shapes everything from how they structures an explanation to how much background they includes before getting to the point.
Beyond the practical stuff, there's something in Tylisia's writing that reflects a real investment in the subject — not performed enthusiasm, but the kind of sustained interest that produces insight over time. They has been paying attention to interior renovation ideas long enough that they notices things a more casual observer would miss. That depth shows up in the work in ways that are hard to fake.
Tylisia Rothwyn writes the kind of interior renovation ideas content that people actually send to each other. Not because it's flashy or controversial, but because it's the sort of thing where you read it and immediately think of three people who need to see it. Tylisia has a talent for identifying the questions that a lot of people have but haven't quite figured out how to articulate yet — and then answering them properly.
They covers a lot of ground: Interior Renovation Ideas, Home Design Inspirations, Gardening and Landscaping Tips, and plenty of adjacent territory that doesn't always get treated with the same seriousness. The consistency across all of it is a certain kind of respect for the reader. Tylisia doesn't assume people are stupid, and they doesn't assume they know everything either. They writes for someone who is genuinely trying to figure something out — because that's usually who's actually reading. That assumption shapes everything from how they structures an explanation to how much background they includes before getting to the point.
Beyond the practical stuff, there's something in Tylisia's writing that reflects a real investment in the subject — not performed enthusiasm, but the kind of sustained interest that produces insight over time. They has been paying attention to interior renovation ideas long enough that they notices things a more casual observer would miss. That depth shows up in the work in ways that are hard to fake.